FCOM Chapter 3 - Normal Procedures
Note: I've broken FCOM Chapter 3 into logical flight sections. It makes more sense to me, so don't expect to see references.
LP Duties
FCOM 3.3.1
- Crew Room
- Checking operational items (ops notices, NOTACs, Wx, NOTAMs)
- Flight plan, calculating / advising fuel
- Crew briefs (7 day + wx conditions)
- Aircraft
- daily / crew change inspection
- CRS
- brief crew on aircraft
Briefings
PPM 12.4.2
Takeoff
FCOM 3.9.11
- Title and departure runway,
- OEI procedure,
- Holding, return for landing or departure alternate if applicable,
- AEO procedure if not on SID (don't forget departure track)
Note
LP may vary RP OEI intentions if they believe alternate procedure is safer
- Title and date,
- Departure runway and procedure,
- Transition instructions if applicable
Approach
FCOM 3.16.2
- Date and title,
- Path/waypoints,
- Altitude requirements
- (IVA) Date and title,
- Elevation and circuit alt,
- Expected manoeuvring:
- Straight in (specify runway),
- Circuit - specify direction, entry, restrictions,
- Nav aids,
- (IVA) ILS/LLZ frequency,
- (IVA) Final approach track.
- PAL frequency (if available),
- Missed approach procedure, and
- Any other items
- Date and title,
- MSA,
- Expected manoeuvring and holding (if applicable)
- Tracking, times, altitude restrictions,
- GS check (ILS),
- MDA/DDA, vis,
- Elevation (or threshold elevation)
- Missed approach procedure,
- Nav aids,
- PAL frequency (if available),
- Circling restrictions
- Any other items.
Additionally for PRM:
* Breakout procedures
| Missed Approach | |
|---|---|
| PF | I will call "Going Around", double click the GA Button, set PL to the 1 o'clock position or set 80% if not using CTOT, using both hands raise to 6.4° initially Ensure calvary charge is silenced prior to YD |
| PM | I will call and action "Flap 7 (or 20) selected, power set, gear selected up, yaw damper on, FD and 1/2 bank" I will Ensure TRQ, ITT, gear limits are not exceeded |
| PM FLAP 35 | Once past VREF 35 + 10, I will call "V REF plus 10" |
| PF FLAP 35 | "Flap 7" |
| PF | At VENR + 10, I will call HDG or NAV, IAS |
| PM | I will select and announce those modes |
| PF | "AP On" |
| PM | "AP On, HDG or LRN1, IAS" |
| PF | "Enter Missed Approach" |
| PM | "Entered" At 400ft AGL, call "Flap 0 speed or + 10 in icing" |
| PF | "Flap 0" |
| PM | "Selected, flap at 0" |
| PF | At 1,000 AGL min VENR + 10 - "Set Climb Power" |
| PM | Conduct the climb scan action flow |
| PF | Above the MSA - "Climb Checklist" |
| PM | Conduct the climb checklist |
Abnormal
FCOM 3.3.3
| EFATO | |
|---|---|
| PF | Before V1, either pilot may call “Failure”. If the FO calls it, the Captain may call “Stop” or “Go”. At V1 the take-off will continue, climbing out at V2. In the event of a malfunction, I will call “Positive rate, gear up, Max Power”. |
| PM | I will check for positive Rate of Climb, Select gear up, Set CTOT to rated power, ensure both FD ON. If Max Power is not achieved on the good engine, I will advance power levers to max power. I will then call “Selected, Max Power set, 1⁄2 bank on”. I will monitor engine gauges. I will confirm that the prop has autocoarsened by checking prop gearbox oil pressure outside of the green arc and correct CWP indications are displayed. |
| PF | I will check the ball is centred and call “Yaw Damper On”. |
| PM | I will confirm the ball is centred, select the Yaw Damper ON and call “Selected”. |
| PM A/C | If autocoarsen has not occurred, either pilot may call “Negative Autocoarsen”. |
| PF A/C | I will respond “Confirmed, engine failure memory items” |
| PM A/C | We will action the memory items. |
| PM | On reaching the acceleration altitude, I will call “Flap at Zero, Enroute or Enroute + 10 in icing” (and the speed). |
| PF | I will accelerate to this speed call “Autopilot ON”. |
| PM | “Autopilot on, heading, indicated, 1⁄2 bank on”. |
| PM F15 | On reaching the acceleration altitude, I will call “Flap Zero ...” (and the flap up speed, + 10 in icing) |
| PF F15 | I will select ALT and accelerate towards Enroute or Enroute + 10 in icing Passing the flap up speed I will call “Flap Zero”. |
| PM F15 | “Selected, Enroute or Enroute + 10 in icing (and the speed). When flaps indicate zero I will call “Flaps at Zero”. |
| PF F15 | At VENROUTE or VENROUTE +10 I will call “Indicated”, AP on |
| PM F15 | “Autopilot on, heading, indicated, 1⁄2 bank on”. |
| PF | “Identify the Failure”. |
| PM | I will check all the engine gauges and call “Left (or right) engine failure”. |
| PF | “Confirmed, engine failure memory items”. |
| CR | We will action the memory items and then consider performance. |
| PF | “Check circuit breakers”. |
| CR | We will check our circuit breakers. |
| PF | “Emergency Cover Checklist”. |
| CR | I will retrieve the Emergency Cover Checklist and read from the top the appropriate checks. |
Land Evac
- Approx 1 minute prior to impact I will lock my harness and the PM will announce the brace command or create four chimes
- When the aircraft comes to a complete stop, I will make an initial assessment of the cabin and either order everyone to remain seated or Flight Attendant to their station
- Following subsequent assessment, I will either order Flight Attendant stand down or order and execute the ‘emergency evacuation duties’.
- Don cap
- Take torch
- Evacuate passengers
- Check cabin
- Shout final commands
- Exit aircraft through primary / secondary escape paths and meet with crew
- Account for all pax
Water Evac
- Approx 1 minute prior to impact I will lock my harness and the PM will announce the brace command or create four chimes
- After impact I will order and execute the ‘emergency evacuation duties’.
- Don cap
- Don life jacket (do not inflate)
- Take torch
- Evacuate passengers
- Check cabin
- Shout final commands
- Exit aircraft through primary / secondary escape paths, inflate life jacket, and meet with crew
- Account for all pax
Rapid Depressurisation
- We will conduct our Memory Items
- The PM will call over the PA ‘This is the Captain. Emergency Descent!’
- Descend to 10,000
Hijacking
- In response to the Flight Attendant's call: ‘Captain I must come to the Flight Deck immediately’
- The PM will respond 'No' and ensure the door is locked
- Squawk code 7500
Land Evac
- Approx 1 minute prior to impact I will lock my harness and the PM will announce the brace command or create four chimes
- I will then set the 3 emerg switches to on
- If the Captain orders ‘emergency evacuation duties’ I will execute those then:
- Don cap
- Take torch and fire extinguisher
- Exit aircraft through the primary or secondary escape paths
- Check for fire and extinguish
- Ensure passengers remain grouped and wait for Crew
Water Evac
- Approx 1 minute prior to impact I will lock my harness and the PM will announce the brace command or create four chimes
- I will then set the 3 emerg switches to on
- If the Captain orders ‘emergency evacuation duties’ I will execute those then:
- Don life jacket (do not inflate)
- Don cap
- Take torch
- Relieve FA at forward doors
- Shout Evac commands until relieved by crew or all pax have evacuated
- Exit aircraft through the primary or secondary escape path, inflate life jacket
- Ensure passengers remain grouped and wait for Crew
Rapid Depressurisation
- We will conduct our Memory Items
- The PM will call over the PA ‘This is the Captain. Emergency Descent!’
- Descend to 10,000
Hijacking
- In response to the Flight Attendant's call: ‘Captain I must come to the Flight Deck immediately’
- The PM will respond 'No' and ensure the door is locked
- Squawk code 7500
Aircraft Inspections
FCOM 3.4
Conduct crew change when:
- Crew has changed on aircraft,
- Aircraft has been left unattended and not under the continuous surveillance of the air crew,
- When the aircraft has been taken off line for maintenance
Use of Batteries
FCOM 3.4.1
Only use batteries when required (e.g. completing checks, boarding pax)
Preserving batteries:
- EXT lights should be off when not required,
- Prudent use of ESS AVION,
- HYD pump uses considerable load (avoid using pump in OVRD),
- Be aware HOT BAT BUS items will still use batteries on EXT PWR (i.e. dome light),
Internal Inspection
FCOM 3.4.3
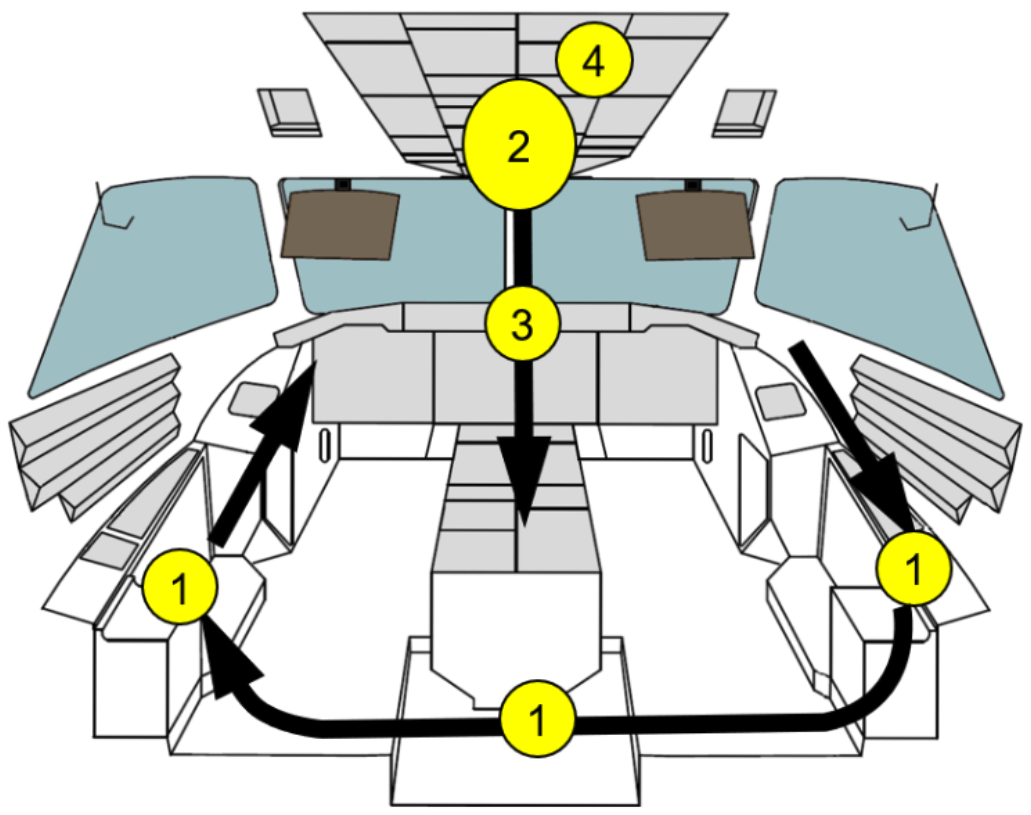
Caution
Perform the first 5 items prior to turning on any electrical power (battery or external)
Cockpit Door
- Ensure no damage to cover material, bonded structure, ballistic panel, metal cappings
- Ensure no dents, cracks, scores visible
- Check blow out protection guard is clean and free from damage
Batteries
- Check batteries individually:
- Left BAT on - check L BAT voltage
- Right BAT on then Left BAT off - check R BAT voltage
- Left BAT on
- BUS TIE light should be ON during the test
- Min for engine start is 24 V each
EXT Power
- Check below 30V
- Set switch to ON, check 26-29V
Avionics
- EXT PWR - 3 Avion ON
- BAT Only - ESS Avion ON
Oxygen
- Check green mark and required oxy supply pressure (1040 PSI, more info supplementary procedures)
EFBs
- Enable data
- Check OzRunways
- Check DB updates
- Update notices
- For Left EFB - check does not obstruct NWS
OXY Mask
- Set 100% Oxy, turn pressure and check flow
- Set audio panel to MASK to check speaker (don't forget to reset back to BOOM)
- Stow mask correctly
3 Pitot Covers
- Check stowed
- Raise NAD AML if covers or flags are damaged / faded
Documents
- Daily inspection checklist
- Valid CRS
- AML
- Defect summary sheet
- DFL
- 2x QRH
- GPS manual
- Load data sheet
- Adequate supply manual trim, TOLD cards
- Climb cruise power chart
- Jump seat briefing card
Documentation
- Valid LC-1
- Valid CRS
- MELs
Fire Handles and Extinguishers
- Check all off and safe tied
Overhead Panel
- Far Left
- STBY PITOT - OFF
- WINDSHIELD - OFF
- PROPELLER - OFF
- EAI - OFF
- BOOT IND - ON
- AUTO CYCLING - OFF
- Left
- AUTO COARSEN - OFF
- L IGN and R IGN - ON
- Right
- INVERTER - 1
- AVION switches - AS REQUIRED
- L and R BATTERY - ON
- EXT POWER - ON (if avail)
- L and R GEN switches - OFF
- SEAT BELT - OFF
- CKPT STERILE - ON
- Far Right
- TEMP SELECT - AUTO
- RECIRC fans - OFF
- L and R BLD VALVE switches - AUTO
- L and R HP VALVE switches - CLOSED
- EMER LIGHT - OFF
All other Switches to be in GUARDED/OFF/CLOSED position
Engine Instruments
- Check Tq, Prop and Engine oil press 0
- ITT, Prop and Engine oil temp read actual temps
- Fuel flow indicates 0
Gear Handle
- Check 3 green
- Test the amber transit lights
HYD Pump
- Check pressure and quantities within green arcs
- OVRD HYD Pump as required
Cabin Pressure
- Select manual then auto to check fault light illuminate then extinguish
- Manual pressurisation knob closed (fully counter clockwise)
- Rate at index, Altitude at destination field elevation, Baro to QNH
Condition Levers
- Place in START, check for SBY PRESS lights illuminate
- Reselect to FUELL OFF
Tests
- Trims
- Check individual split switches for NIL movement
- Run STBY PITCH until trim split 1.5 units, check PITCH TRIM CWP triggers
- Press PITCH RESET and verify main / STBY trims do not synchronize
- Equalise main and STBY pitch trims, press PITCH RESET
- Verify main and STBY pitch trims sync, CWP extinguishes
- Check LP pitch trim switches override RP pitch trim switches
- GPS
- Check Lat / Lon against CDP
- Confirm date and time correct
- Confirm data card correct to cover period of flight
- PA System
- Select and test PA, CALL, EMERG
- Confirm microphone, chime and light works
- Stall
- Gust lock off
- STALL 1 UP
- L+R stickshakers
- L+R stall warning clacker sound
- Push 1 illuminates
- STALL 2 UP
- L+R stickshakers
- L+R stall warning clacker sound
- Push 2 illuminates
- Pull control column rearward
- STALL 1+2 UP
- L+R stickshakers
- L+R stall warning clacker sound
- Stickpusher to push, PUSH 1+2 illuminates
- Pull control column rearward
- STALL 1+2 DOWN
- L+R stickshakers
- L+R stall warning clacker sound
- Stickpusher DOES NOT push, PUSH 1+2 illuminates
- Gust lock ON, press rudder pedals and controls to ensure locking
- Lamp Test
- Autocoarsen ON
- Check for blown globes
- Autocoarsen OFF
- Fuel Test
- Hold FUEL in L/R position
- Check L/R fuel quantity 455 ± 23kg
- Check L/R fuel flow 345 ± 16kg
- Check gauge aligns with DFL
- Fire Warning
- Hold FIRE test in L/R
- Check L/R MASTER Warning and fire bell
- Push light to cancel aural warnings
- Check L/R ENG FIRE, TAIL PIPE HOT CWP, L/R Fire Handle lights illuminate
- Fire Short
- Hold FIRE short UP
- Check L/R MASTER Caution
- Push light to cancel aural warning
- Check L/R FIRE DET FAIL CWP illuminates
- Smoke
- Hold SMOKE UP
- Check L/R MASTER Warning
- Push light to cancel aural warning
- Check AVION SMOKE, CARGO SMOKE, LAV SMOKE light illuminate
Starting
General
FCOM 3.9.1
Prior to pre-start scan, try to have T/O brief completed and navaids set
Don't start with pax on bay, and wait until RP is seated and ready to assist. Ensure starting in accordance with PPM starting requirements.
Min acceptable voltage is 24V, however if voltage is less than 24.5V, turn off all unnecessary equipment prior to first start
Engineering inspection is required after 2 hung starts
Consult engineering if after hung start batteries are 24.5V and intending to perform battery start
If any limit or abnormality occurs, notify engineering ASAP and complete abnormal engine start report form
For starting in tailwind, motor to min 20% Ng and 150°, pay close attention to ITT during start
If excessive tailwind and operationally possible, start one engine, taxi into wind (requires SMS)
Min GPU amperage for start is 1400A (if less, perform Batt / x gen start)
Battery carts may be used if higher voltage than aircraft batteries and not below 25V (only start first engine on cart)
For Batt Cart, start first engine, switch associated gen to RESET/ON, EXT PWR to OFF, wait min 1 min. Give GPU disconnect signal once both engines running
Start only Batt Carts can only be used 5 min prior to start, verify abv 28V prior to start
Caution
Never intentionally select ground power to OFF during engine start
Note
Batt Carts can indicate less than 26V, compare this with aircraft batteries and use the higher voltage for normal ops (inc starts)
Note
If GPU drops offline during start and switch is being held or starter relay is energized, all power excluding the HOT and EMERG busses will be lost (resulting in loss of FD/Cabin lighting). Release start switch or CL FO to return power. Note EXT PWR switch will not automatically move to OFF
Note
Starter may fail to disengage for multiple reasons. Failure of starter pickup signal is indicated by hung start at approx 55% Ng, or if IGN light does not go out and not possible to reset the GEN after start. Select IGN switch to OFF then NORM, and conduct failure management if no longer an issue. If starter is still engaged, conduct start seq interrupted memory items, and if this fails turn off all power to the aircraft (Batt/EXT)
Starting Second Engine W/O GPU
FCOM 3.9.8
After first engine:
- RECIRC fans on (and HPs if able),
- Check gen,
- L/R AVION on,
- FMS on and enter flight plan.
Consider discussing T/O brief.
Wait min 1 min and until EFIS is initilised, then turn AVION off, HPs off
Note
If RECIRC fan is running on ground without ACM, overheat may occur, reducing life of the fan
Pre-Start Scan
FCOM 3.7.1
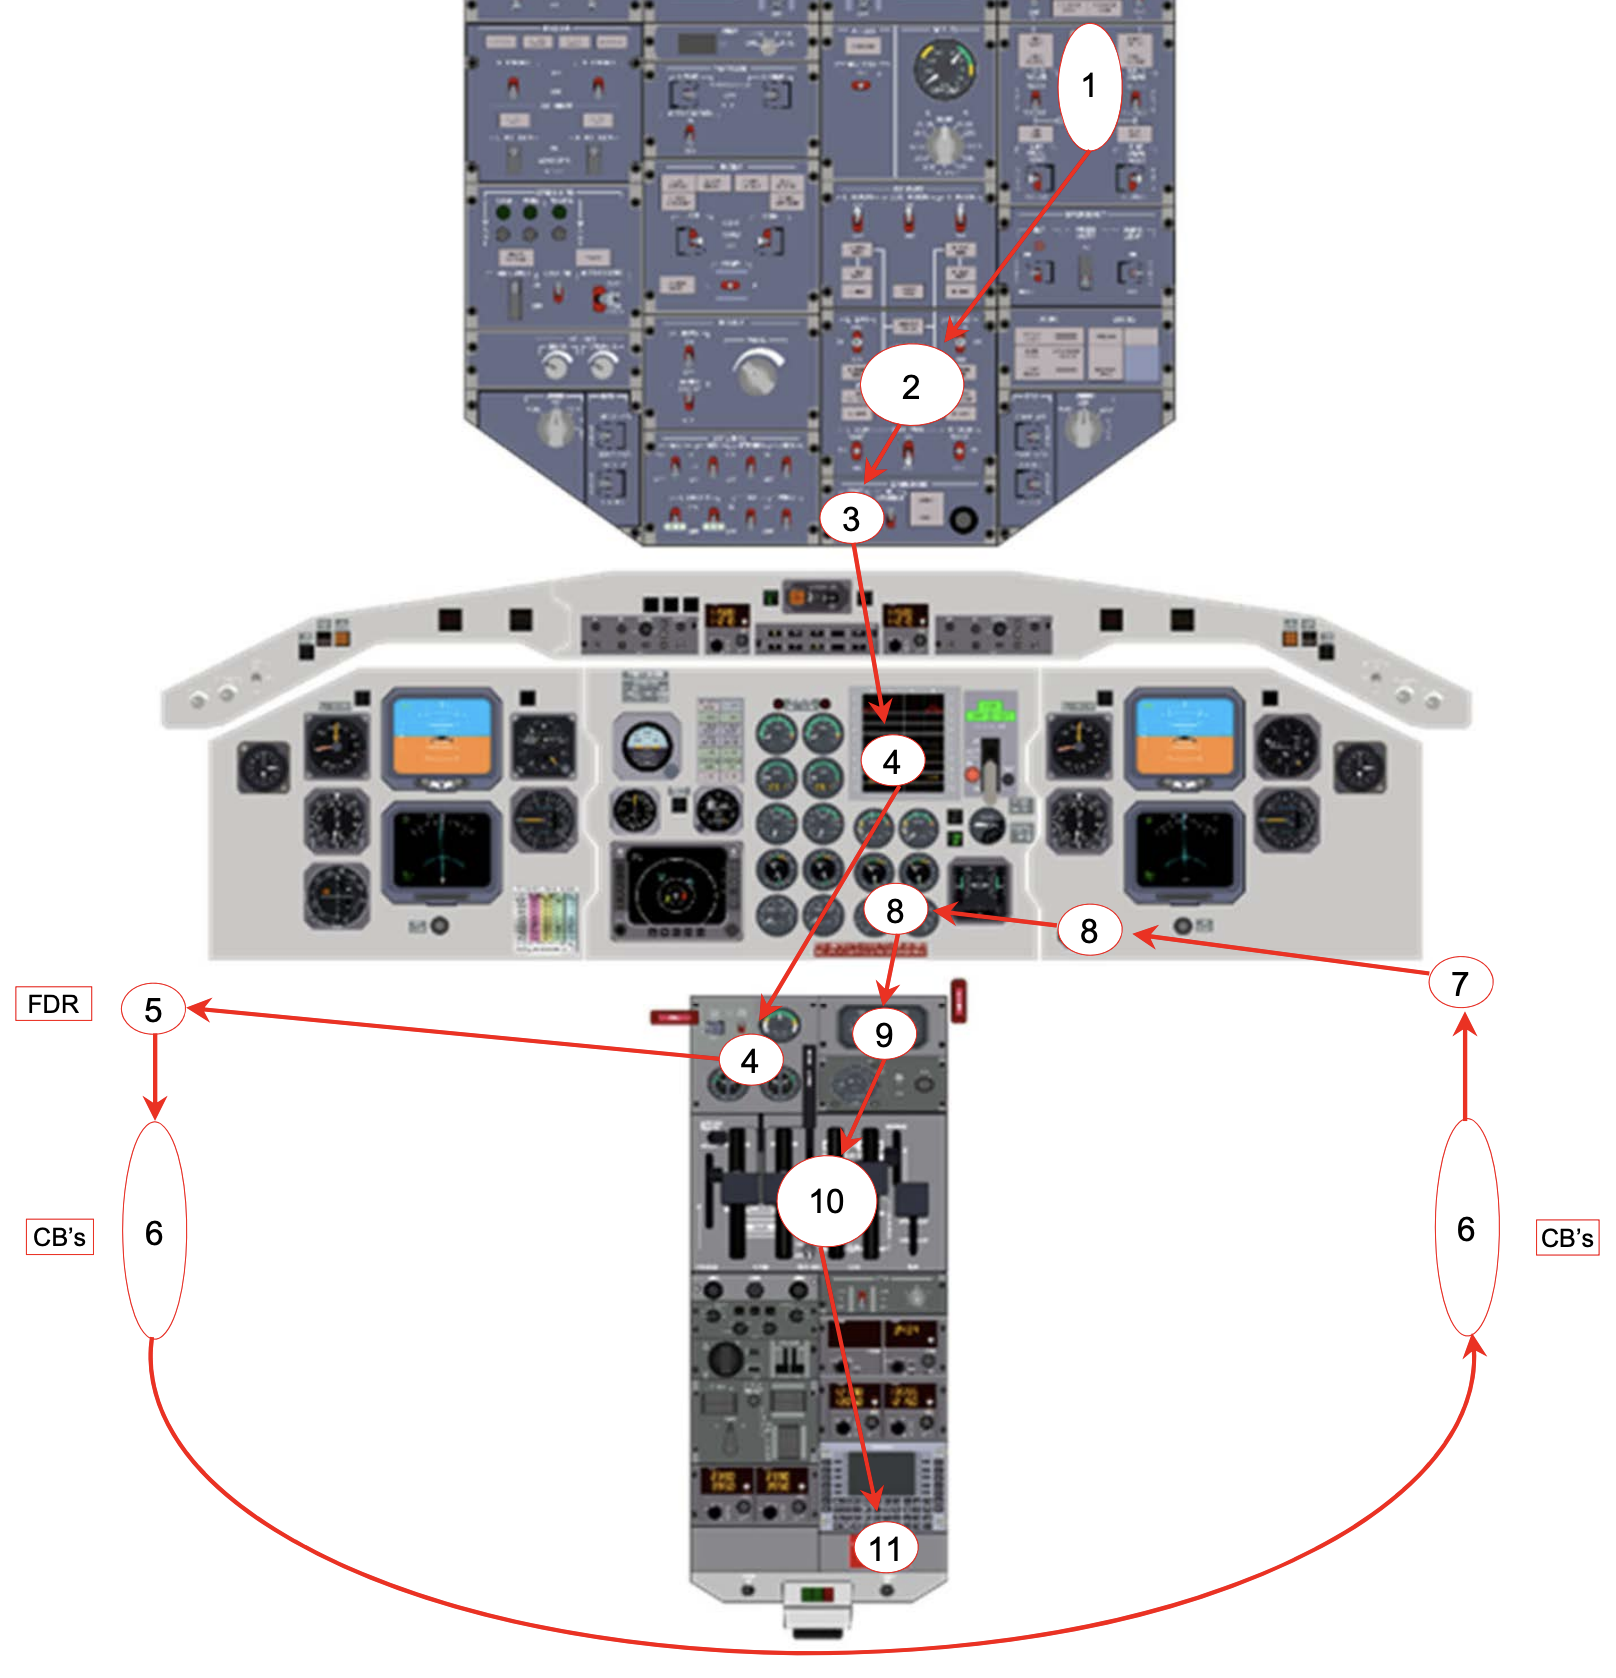
1 - ECS
2 - BATT / EXT PWR
- Check both BATT min 24V
- Check EXT PWR max 30V, turn on and check white light on
- check EXT PWR now between 26V and 29V
- Consider EFIS
3 - LIGHTS
- Seat belt sign on
- Nav light on if any part of flight is at night / poor vis
4 - PARK BRAKE / HYD PANEL
- Check CWP light on
- Check all pressures / quantities in green (set pump to OVRD if not)
- Check HYD PUMP switch in AUTO and guarded
5 - FDR
6 - CB's
7 - OXY
8 - FUEL
- Reset fuel counter
- Check fuel quantity conforms with flight plan fuel
- Reset fuel in balance
9 - CABIN PRESS
- R - set at detent
- A - set destination altitude
- B - set actual QNH
- Mode selector AUTO
- Manual pressurisation knob at index (fully counter clockwise)
10 - PL / CL
11 - CABIN SECURE
Start Scan
FCOM 3.9.6
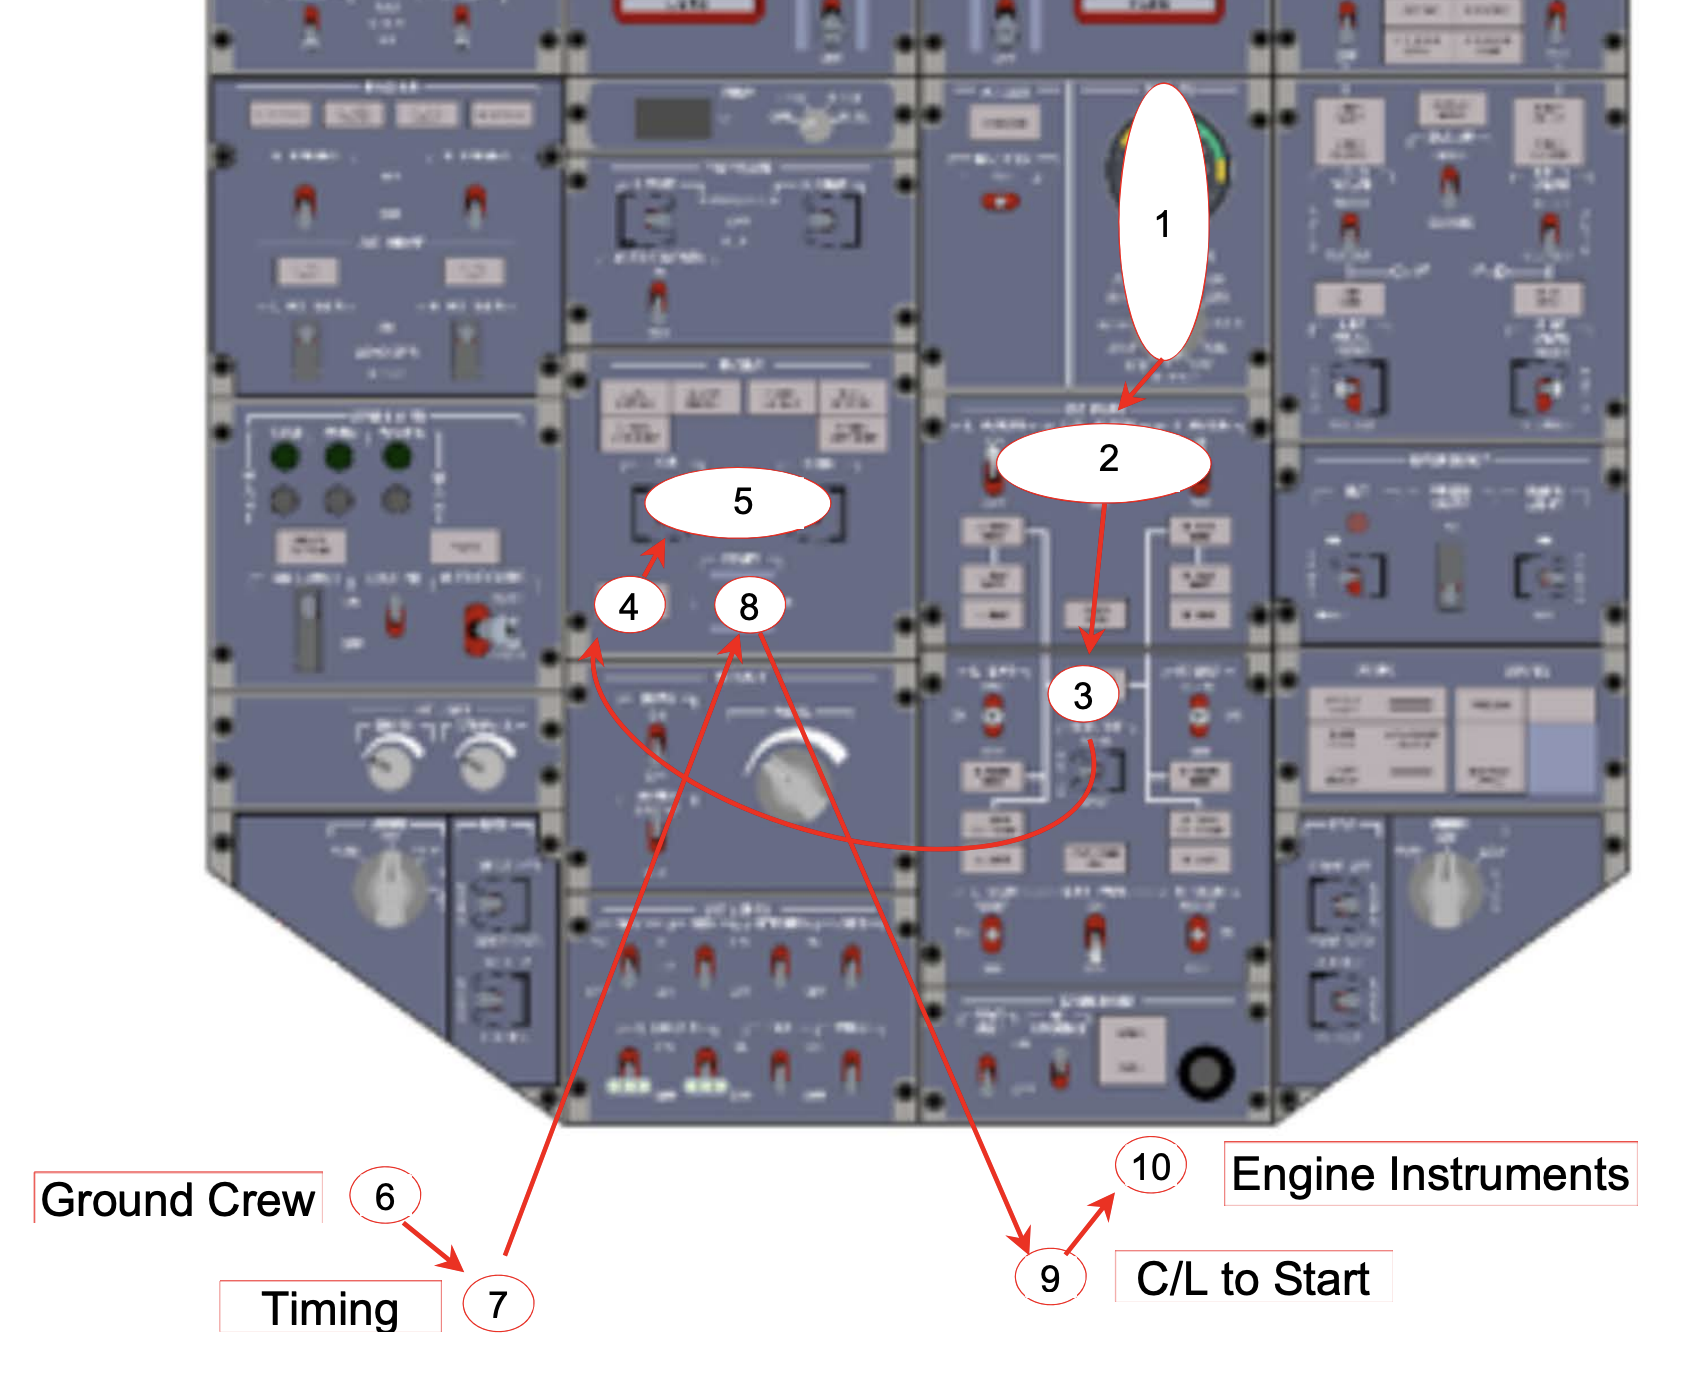
Ensure prop is clear prior to each start
1 - Voltmeter
- BATT min 24V
- EXT PWR 28-29.5V
2 - Avionics
3 - Bus Tie
4 - No Bat Start
- Refer QNH if illuminated
5 - Ignitions
6 - Start Clearance
7 - Timing
8 - Starter
Caution
Observe starter duty limits. If ITT does not decrease below 175° in 30s, stop motoring, release the switch
- Wait until Ng and ITT stabilised:
- Ng - min 17, max 26, tailwind 20
- ITT - below 175° (150° tailwind)
- Use right hand to move CL to START, set (w/i 2s) IGN to NORM, hand back to CL
- Release IGN switch when ITT starts increases
9 - CL
Caution
Ensure CL is moved to start before IGN to NORM to prevent damage to PDU starter relay
10 - Monitor
- EXT PWR Voltage
- Ng
- ITT (below 965)
- Oil Pressure
- Prop Rotation
- Starter Cutout (max time with starter - 70s)
- Fuel Flow
Caution
During X-Gen start, monitor operating engine due to increased load
After Each Start Scan
FCOM 3.9.7
1 - Starter
- Check IGN light out, CWP lights return
2 - ITT
3 - Engine Instruments
- All engine / fuel panel lights should be out for the started engine
- Check the instruments are indicating normal parameters
4 - Bus Tie
5 - Generator
- Gen will not come online if GPU is supplying power
Note
- PROP RPM indications may be missing at low prop speeds due low Np sensor output signals
- FF indications may be delayed during start
- Ng increase may be slow, but as long as ITT doesn't exceed 965/960, the start may continue
- If Ng stops accelerating for 3 seconds, about start immediately
After Start Scan
FCOM 3.9.9
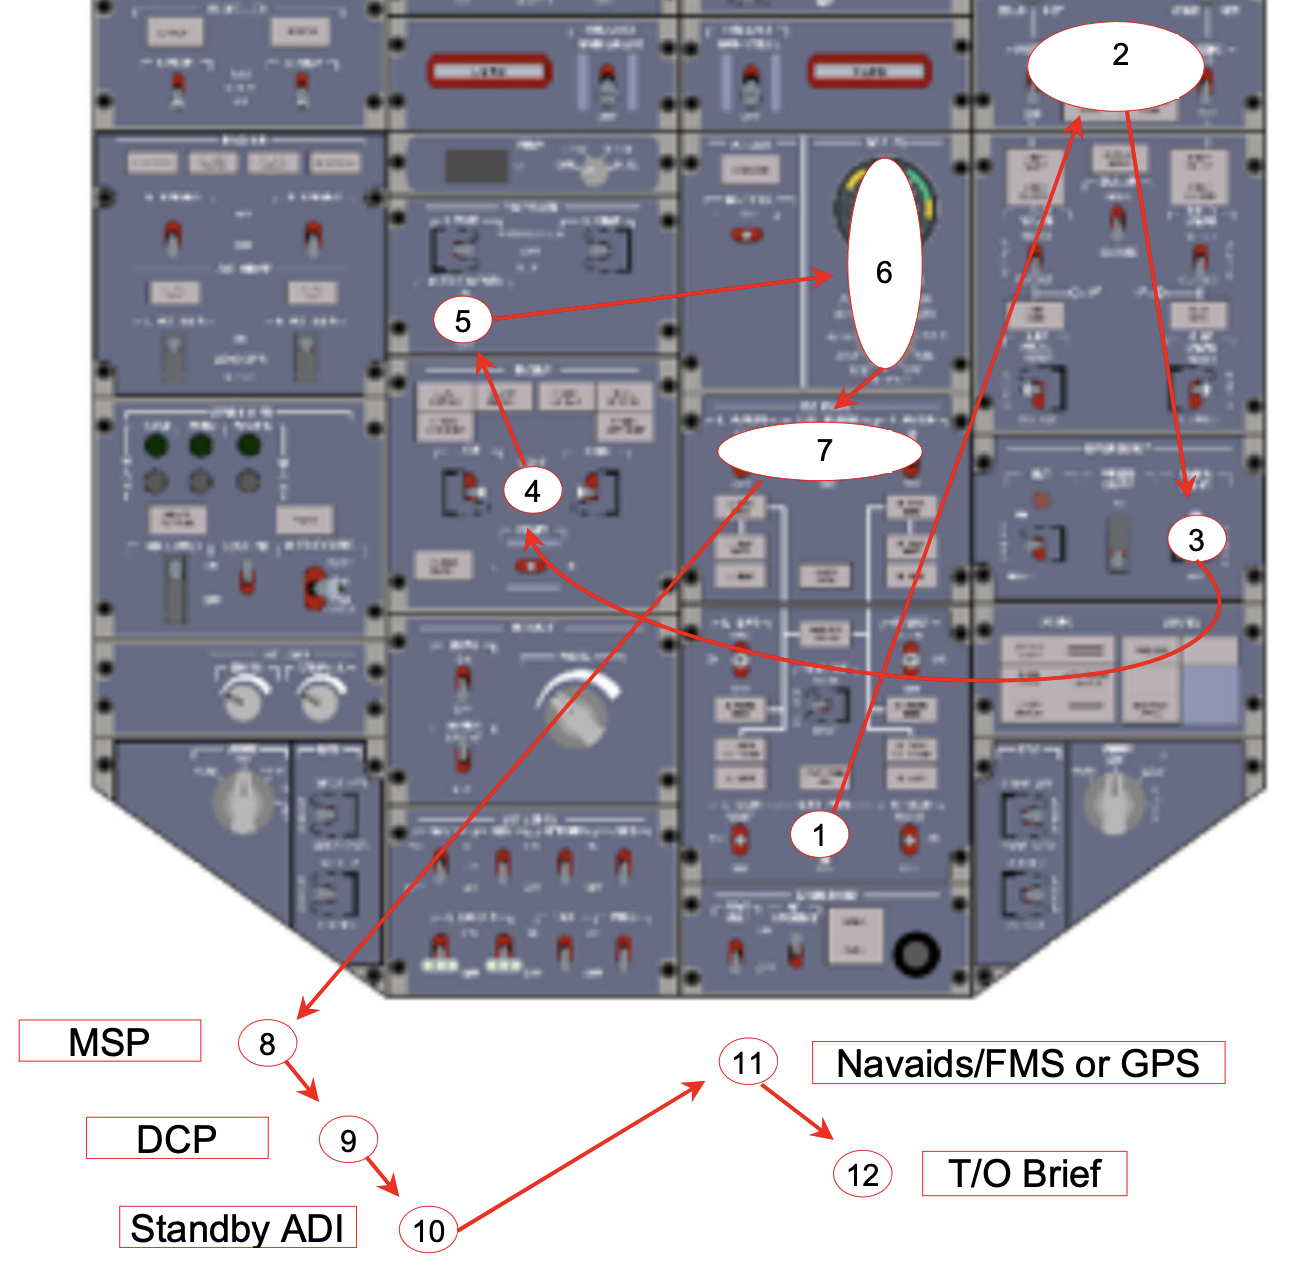
Once both engines are started
1 - EXT Power
2 - Aircon / RECIRCs
- Set aircon as required
- Turn on RECIRC fans as required, considering cabin temp and pax load
3 - Emergency Lights
4 - IGNs
5 - Autocoarsen
6 - Generators
- Check min 27.5V
- Check min 50A
- Set DC volt selector to LEFT GEN position
7 - Avionics
- Set 3 switches to ON
- Wait until HYD Pump stops before turning on
8 - MSP
9 - DSP
10 - Standby ADI
- Wait until red flag retracts, pull cage
11 - Navaids / FMS
- Wait until RP has completed their scan flow
- May be completed earlier, try as soon as airways clearance. If already done, call "Navaids Set"
APA set on xxxx, VORs set on xx, DMEs set on xx, Course Bars set on 000,
ADFs set on xx, FMS confirmed to (waypoint), Flight ID RXAxxx, Code xxxx
HDG / LRN1, IAS, 1/2 Bank On, Navigating L/R Side, HDG Bug set xxx
12 - Takeoff Brief
- Ensure correct OZRunways charts are selected
- Can be completed up to 30 min before departure, or prior to engine start (considering pax comfort), or between battery starts
After Start Checklist
FCOM 3.9.12
7 - External Power
- Check EXT PWR switch is off
- Check EXT PWR white and blue lights are off
8 - Autocoarsen
- Check switch and autocoarsen low light is illuminated on FSP
9 - EFBs
- Ensure ground chart selected
11 - Condition Levers
Caution
When moving CL to MIN range:
- PL must be at / abv GND IDLE,
- Monitor ENGINE RPM,
- Ensure PROP RPM advances normally,
- Keep hand on CL until BG enabled,
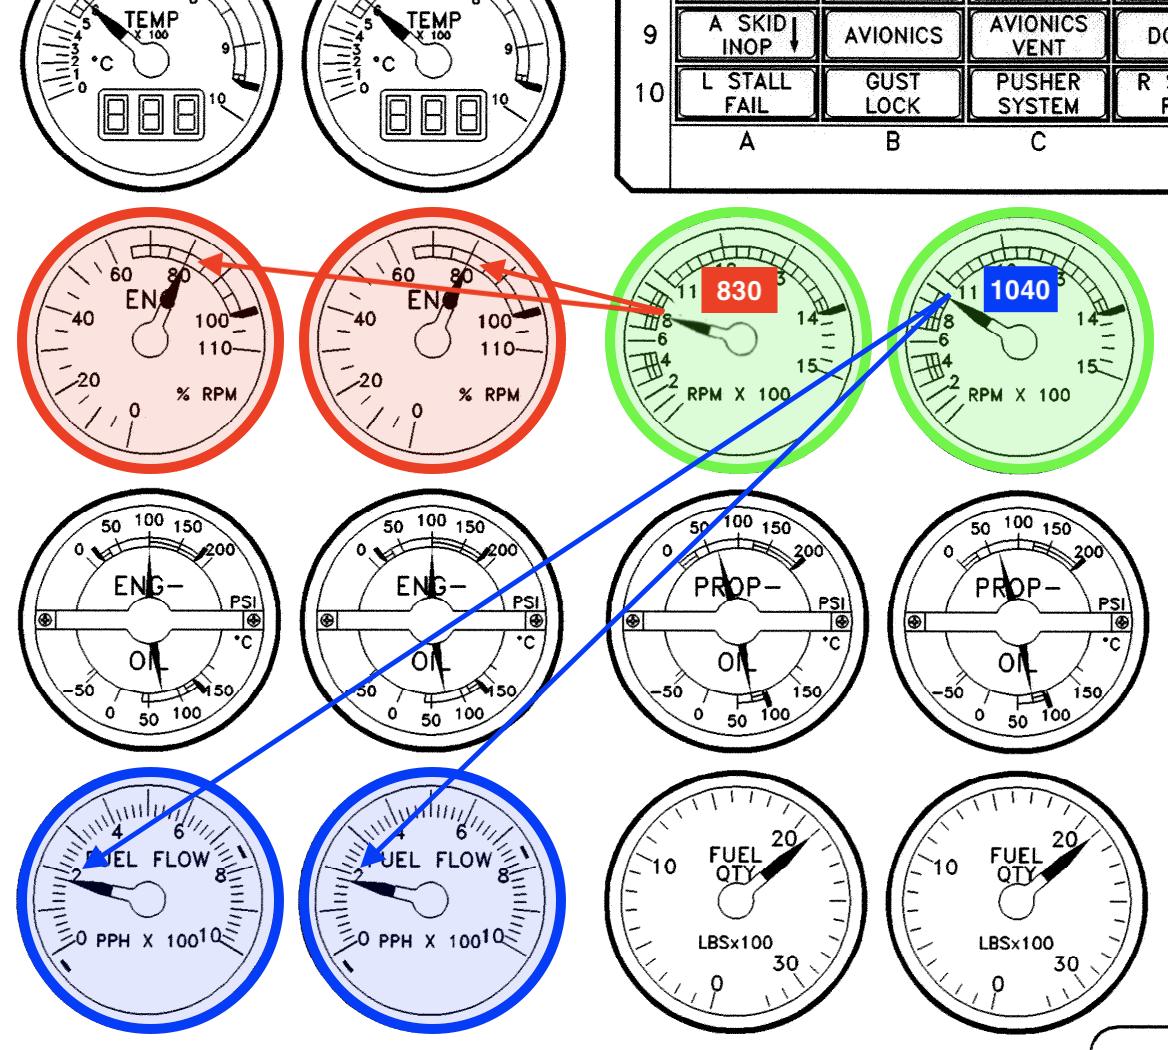
- BG engagement is indicated by slight FF increase and small increase in Ng at 830 PRPM (581 A model)
- If ENGINE RPM increases prior to PROP RPM reaching 830 PRPM (581 A model), retard CL to FUEL OFF as overTq / overspeed may occur,
- Move CL to MAX for taxi, engage friction lock
Caution
Winds over 50kts and fully aft CG can cause the aircraft to tail tip when moving CL to MAX due to the pitching movement cause by the prop drag from the wind
12 - CWP / OHEAD
- Check no lights except for PARK BRAKE or other acceptable lights
Note
LP is responsible for external lights (i.e. beacons / strobes / nav / taxi / landing lights) in accordance with Ch12
Taxiing
FCOM 3.10
Before moving, confirm direction of exit from bay, move forward slowly and test the brakes. Always ensure downward pressure on tiller, especially when stopped on a slope. Set park brake if wanting to move left hand off tiller.
Ensure you follow the taxi procedures and distances in the PPM.
Once clear of congested areas, can call for taxi checklist
7 - Flight Instruments
- Read QNH and altitudes from left and STBY altimeter
... (QNH), ... ft, ... ft (reading altitude)
ADI's erect, ASI zero, V2 ... set,
HSI RMI indicate ..., STBY compass checked,
VSI's zero, TAWS fault light out/on
Note
If TAWS fault light remains on, consider system unserviceable, refer MEL. If internal GPS has failed, basic GPWS modes are still available.
Use of HPs on the Ground
Can be used if OAT is greater than 20°C or less than 0°C Available with the props feathered or in MIN/MAX range (excluding A Models, which prohibit their use with the props feathered).
With props feathered:
- Set 77% NG
- Turn HPs on
- Restore 77% NG
- Use X-VALVE as required (if only one engine started, for example)
Max 800°C ITT with HPs on, and 2 min cool down period required after HP use prior to engine shutdown.
Turn HPs off for engine start, transition from feather to MIN/MAX range, and take-off.
Line Up
FCOM 3.12
Must check runway is clear and stop bars are out.
"Clear left, stop bars out / no stop bars, clear right"
When cleared to line up, call for "Line Up Checklist"
1 - Controls
- Move hand to side latch
- Check Rudder for full free movement
- "Rudder checked"
Caution
Winds gusting over 40kts and aft CG (aft of 30% MAC) can cause the aircraft to tail tip if the flight control check is performed stationary with brakes. In such conditions, maintain gust lock engaged when brakes are applied, and perform check during the taxi to line up
4 - CWP
- Check CWP for correct indications (aircon light is expected)
Takeoff
FCOM 3.13
Switch on landing lights when takeoff clearance received (CTA) or ready to commence takeoff (OCTA)
When ready, call "Takeoff inhibit, timing"
Advance PL to 15-20% takeoff Tq required
When FO calls autocoarsen high, check Tq within 15-20% required Tq, call "Set Power"
At 80 kts, call "Handing / taking over", and if taking over move hand to control column
Directional control should be progressively transferred from NWS to rudder, with full rudder by 60kts.
V speed calls are backup only, do not rely on PM
Positive RoC is defined as clockwise movement of VSI and positive increase on altimeter If VSI is less than 1,000fpm, increase climb attitude to maintain V2 +10 to V2 +15 up to max of 15°
Caution
Prior to departing on wet runway, consider max crosswind component vs braking action (Ch 4 - Low Friction Runways)
Caution
If EAI has been selected ON prior to 6 min after lift off, the ICE SPD system will become active 6 minutes after lift off - EVEN IF THE EAI HAS BEEN SELECTED OFF
Method A
- Brakes ON
- Advance PL to w/i 15-20% takeoff Tq
- Select CTOT APR
- Ensure desired Tq achieved
- Release brakes
Method C
- Advance PL to w/i 15-20% takeoff Tq
- Select CTOT APR (before 60 kts)
Misc Notes
Speed Bugs
Takeoff
If two - set V2 and VENR
If one - set V2 once MSP is set to IAS mode
Landing
If two - set VFA and VENR
If one - set VFA
Guarding Controls
Takeoff
Landing / Approach
- During IAP or when below 1,500ft AGL, must keep hands on controls and PL (approach only)
- PL must be guarded within 1000ft of assigned level, or anytime PL are set below 23% Tq
Half Bank
- Below VENR +10kt (+20 ice)
- Moderate/severe icing
- All OEI departures & climb
If conducting EAI On takeoff, half bank will need to stay on, as you’ll be climbing at VENR +10kt in icing conditions.
Speeds
Normal Climb
- Below MSA - VENR +10kt
- Above MSA -
- High or Medium Climb to cruise
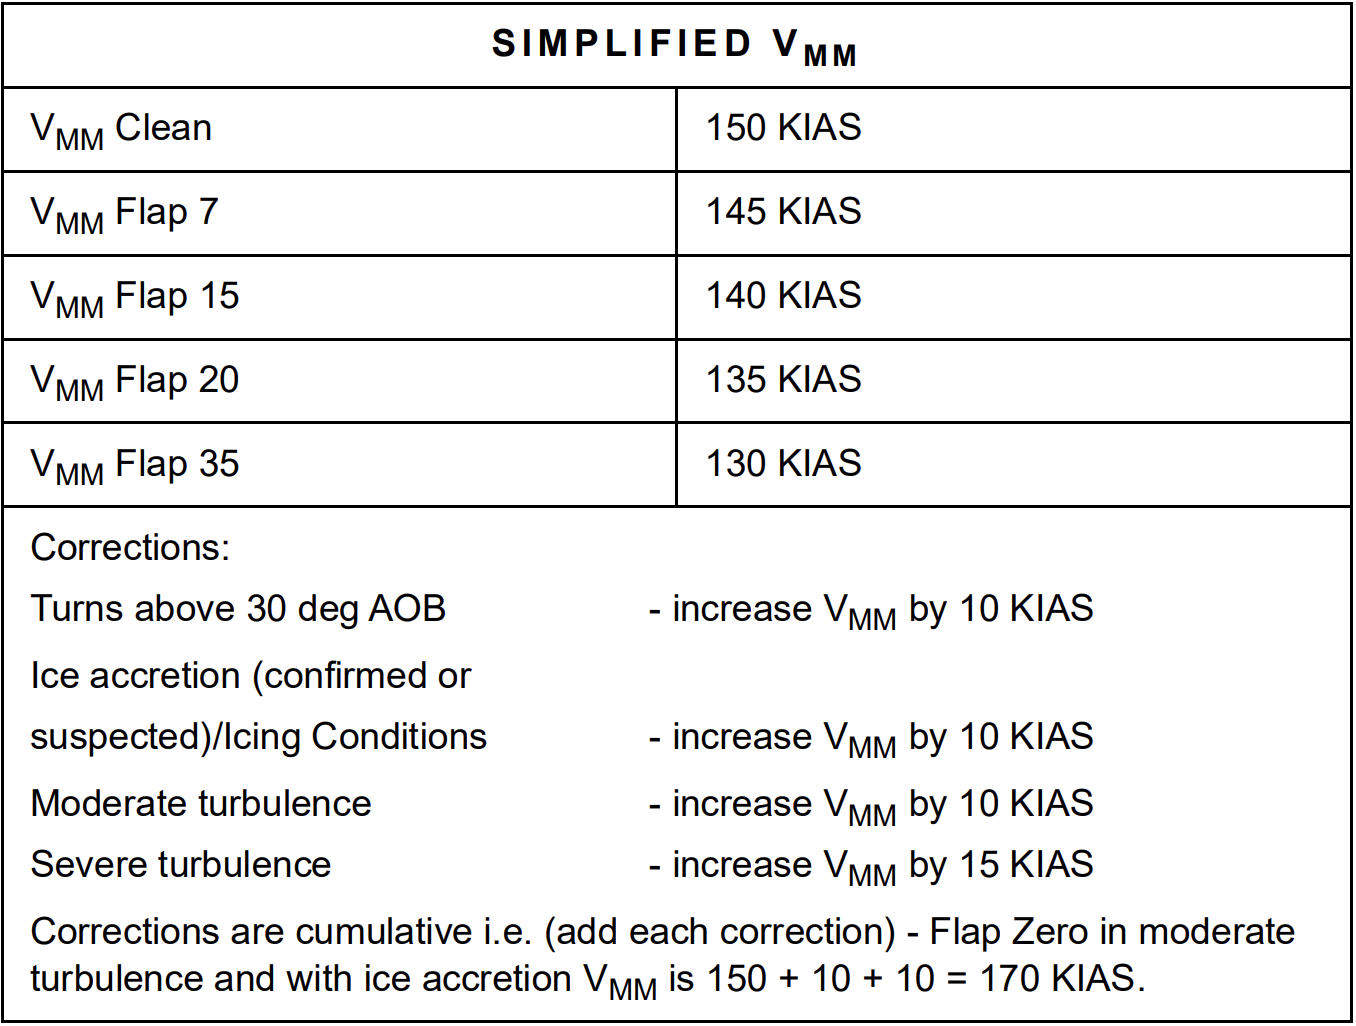
- Min of VMM (150kt) above MSA
Notes
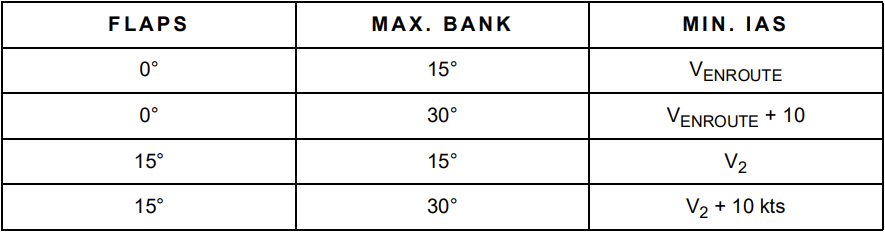
VENROUTE - best climb gradient / OEI enroute climb speed outside of icing VENROUTE +10 - best climb gradient in icing (above MMA, MSA, LSA) / OEI enroute climb speed in icing
Warning
Must not go below VENROUTE +10 in icing except for OEI climb following engine failure up to acceleration altitude
L Climb - best RoC outside icing
M Climb - compromise b/w L and H modes
H Climb - optimum distance / altitude ratio
Min speed for enroute climb is Vmm (inclusive of additions)
Note
Must advise ATC if climbing at a non standard speed
Ice Climb
- Below MSA - VENR +10kt (1/2 Bank)
- Below MSA - VENR +20kt
- Above MSA - Min 160kts (VMM +10)
OEI
- Before ACCL Alt - V2 to V2 +10kt
- After ACCL Alt - VENR (+10kt ice)
Approach
FCOM 3.17.12
| AIP | Company | |
|---|---|---|
| Initial | 240-160 kts | 200-160 kts |
| Final | 160-115 kts | 160-VFA +10 kts |
| Circling | 180 kts | 180-160 kts |
| Missed Approach | 240 kts | VREF+10 to VENROUTE+10 |
Landing
- 50ft Over Threshold - VREF (which is 1.3VS)
VREF C = VREF + MI and/or Ice
VFA = VREF C + Wind
Note
Speed on final (no manoeuvring) shall not be below VENR until in full landing config
VMM
FCOM 3.17.15
Climb
PF shall not call for climb power until:
- Above 1000ft AGL
- Min VENR +10
PF shall not call for climb checklis:
- Departure report given,
- Above MSA,
- Established on track / SID
Note
- RoC / RoD must be less than 1,500fpm prior to selecting ALT on MSP
Can only release FA above MSA
Maintain lookout for DDT, refer QNH if above 30°
Always set Tq variations at a rate of 3% per second or less
Transition checklist - check for fault light out, cabin altitude and rate normal (if not, check manual control knob fully closed)
Use of Radar
Avoid sharp rainfall intensity changes on the weather radar by:
- Below 10,000ft - 5nm (10nm if OAT below 0)
- Between FL150 & FL200 - 10nm to 15nm
- Above FL200 - 20nm
Life & Death Rules:
- At +10 tilt and 20nm range - avoid any return, regardless of whether it’s contouring or not
- At +10 tilt - avoid any contouring return, regardless of distance or height
- At +10 tilt - in the landing config, any contour within 5nm must be avoided or go around
- Don’t take-off if on the ground
Altitude Selection
Headwind - lowest standard level that gives smooth ride
Tailwind - climb while ever the tailwind is same or increasing
When the RoC decreases to 500fpm at Vmm, consider cruising at nearest appropriate FL
Avoid cruising in the clear ice band (0° to -10°) when in cloud
Cruise shall never be below Vmm. Min speed 160kts. If cannot maintain min speed, descend and set max continuous power
Only use VENR when OEI or to escape from severe icing
Fuel Check
Established in cruise, or if diverting, confirm:
- Fuel burnt is reasonable
- FoB is sufficient
- FMS calculated landing wt is within 250kg from planned landing wt
Descent
Normal descent 1,500 - 2,000fpm
Add/subtract 1nm for every 10kts tailwind/headwind
When planning the descent take into account the following considerations:
- Distance to go,
- Wind component,
- Initial altitude,
- Destination elevation,
- Altitude required over destination,
- Weather conditions,
- Turbulence,
- Cabin pressurisation,
- ATC/STAR requirements (e.g. 7,000 ft by 20 nm)
- MSA, LSA, CTA/DME steps, traffic etc., and
- Use of FMS VNAV is encouraged (cannot use as primary means of descent point calculation)
Approach
Visual descent at night - Max 180kts by 5nm straight in or circuit
When selecting autocoarsen on, check for faulty Tq gauge (zero or erratic)
Note
Must not descend below 1,000ft AGL or commence IAP unless the cabin is secure and FA is seated
Prior to approach, consider:
- Enroute Weather,
- Surface Conditions,
- Traffic,
- ATC Requirements/Instructions, and
- Track Miles Required.
Company preferred approach options:
- ILS,
- LLZ,
- RNP,
- VOR, and
- NDB.
Where not possible, or would require excessive track miles, consider DGA
IVA - don't cross centerline, intercept below 200kts, maintain visual lookout for traffic, respond to TCAS RA if required, report runway in sight if able to maintain visual during approach
Ensure lighting switched on within 15 nm at / above the LSALT
Note
- If OEI and level segments, delay gear until final descent for landing
- Flight below 500ft AGL without gear will cause hard TAWS "TOO LOW GEAR"
- All straight in landing MDAs should be increased by 30ft
- For FMS CDI during visual circuit, set up above the MSA
Identifying nav aids - EHSI ADF has built in self monitoring system = no need to monitor ident.
If failure on plane or ground, ADF indicator will turn red and flash for 10s
If any doubt to accuracy of equipment, monitor and test ON the aid, note fault code in AML
Holding
FCOM 3.16.11
160 kts (170 kts ice) clean
Moderate / severe ice, enable 1/2 bank (advice ATC, ensure terrain clearance)
May need to bump up Tq by 6% in turns
Glide Slope Check
FCOM 3.17.19
PIC responsibility to ensure ILS is giving correct indications
Examples of discrepancies:
- Temperature
- Temps above ISA = low altitude check reading
- Temps below ISA = high altitude check reading
- Approx. rule of thumb is HT above source ft (1000s) x 4 (%) x ISA diff = expected discrepancy
- Aircraft not on glide slope
- One dot deflection at the outer marker (approx 4 nm) equals approximately 150 ft discrepancy
- Use of other than actual QNH (possibly forecast).
Examples of unexplained discrepancies:
- The incorrect DME for an ILS/DME is selected.
- The GP is not radiating or is radiating falsely.
- A gross error in altimeter setting.
If any unexplained discrepancy is detected at the glide slope/altitude check the LLZ MDA shall be used. The PM shall call new MDA.
Flap Selection
Flap is based on balance of handling characteristics, performance and landing manoeuvres
Consider:
- runway length,
- tail wind,
- cross wind (recommended in strong gusty conditions greater than 15kts)
- wet runway, and
- go-around performance (refer to Aircraft Performance Manual).
Flap 20 - increased landing speeds and RWY length, improves go-around performance and reduces flap wear
Flap 35 - reduced landing speeds and RWY length, reduced tyre and brake wear.
Landing Flap must be SET by 300 ft AGL. If not expecting to get visual by 500 ft, plan and carry out a landing with Flap 20.
Landing Procedure
300m aiming point (start of middle touchdown zone marking)
If RWY greater than 2400m, then aiming point may be adjsuted
Wind increment can be bled off from 50ft
Only bleed VREF C until commencing the flare
Flare should be 4-5° nose up (greater than 10 = tailstrike)
Can use reverse if only one beta light, but do so with extreme caution
Avoid using reverse below 50kts, especially after flight in icing conditions
Must select GI at 60kts to be out of reverse by 50kts
If LP thinks reverse is necessary, may call "Reverse Power"
Crosswind Landings
Precipitation may create illusions, especially at night:
- Impression of no drift, when there is considerable (downwind side of RWY centerline)
- False impression of drift (upwind side of runway)
Tailwind Landings
If in excess of 10kts:
- PIC only
- RWY aligned with profile guidance for that runway
- Performance data is published and capable
Flight Idle Stop
If blue FI STOP FSP light fails to illuminate, or PL can't be moved below FI on touchdown, either pilot can call "Negative FI Stop"
PF responde "Override"
Go Around
Prior to FAF (or established inbound if no FAF) - set go around manually
Visual Approach - above 1,000ft AGL set go around manually
ILS / PRM Break Out
| PF | PM |
|---|---|
| "Breaking L/R heading ..., climbing / descending ..." | Set HDG bug, select HDG on MSP, set APA |
| D/C AP, turn to assigned heading, set power as required | Readback to ATC: "Breaking L/R heading..., climbing / descending..." |
| Climbing breakout - when on assigned heading call going around Descending - don't reconfigure until cleared to climb |
Note
For dual MSP aircraft, may need to select HDG on both panels if in APPR mode
Ground Taxi After Landing
Maintain directional control using rudder, arm NSW at 80kts, transition from rudder to NWS
If directional control problems suspected, can take over early
80kts - LP call "Your Ailerons", move hand to tiller
40kts - LP call "Gust Lock", MOVE HAND TO GUST LOCK RELEASE, lock rudder with feet
Caution
If veering to one side, deselect reverse and use forward power if necessary. Straighten with use of rudder, NWS, diff braking. Then use reverse as required
Use of Brakes
Carbon brakes prone to wear in cold
Keep taxi speeds low, use engine / props (ground idle) for speed control
ATC, and airmanship permitting, brakes are only to be used when the aircraft cannot be sufficiently slowed using reverse and full runway length
Note
if antiskid system is modulating pressure, inc pedal will have no effect. If this is the case, decrease pedal pressure on opposite side to intended direction of turn
After Landing Checklist
FCOM 3.18.1
1 - Cabin Diff
- If not more than 0.3 psi, open the hatch
- If unable to open the hatch, use EMERG PRESS DUMP switch
Parking
Park brake - press pedals and pull handle out, rotating it clockwise through 30°. Release pedals when CWP light comes on
Shutdown Scan
1 - Park Brake
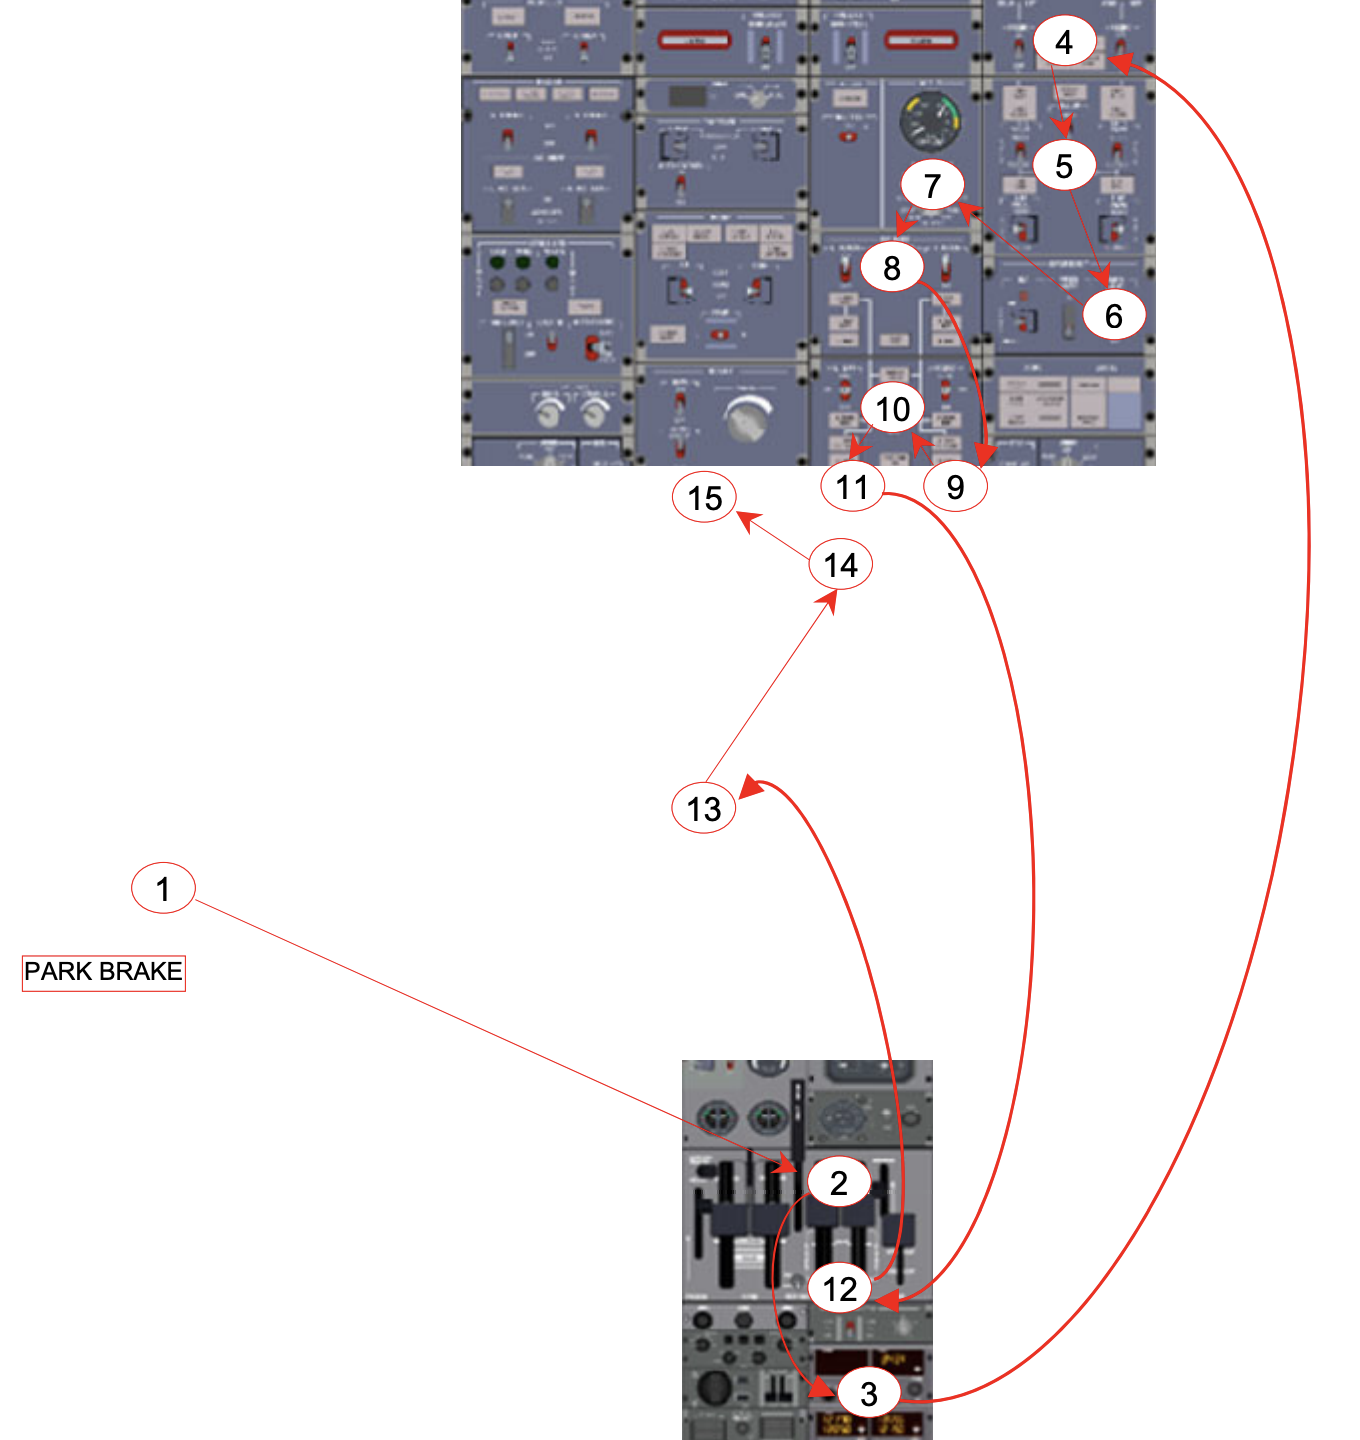
2 - CL
- Smooth feathering is noticed by PROP OIL pressure initially rising, then drops when CL is 1/2 way between MIN and START
- At the pressure rise, hold CL in that position for a few seconds, then move slowly into START
3 - Transponder
4 - Recircs
5 - ECS (BLD / HP)
6 - Emergency Lights
7 - Volt Selector
8 - Avionics
9 - R Gen
10 - Bus Tie
11 - L Gen
12 - CL
- Allow ITTs to stabilise, then move FO
13 - Auto Ignition (B Model)
- Check illuminating on FSP
- Will illuminate when Ng drops below 62% (may need to set Ng b/w 75-77% for test)
- If IGN lights fail to illuminate, consider system unservicible. Refer MEL
14 - Seat Belt Sign
- Only when engines are shutting down
15 - Beacon
- Once both propellers have stopped turning
Caution
When CL is moved to START, PROP RPM should decrease. If PRPM doens't decrease, move CL to Fuel Off as over Tq / ITT may occur
Note
All engines must have 2 min cooldown from the latest of:
- on landing if the PL remain between FI and GI (no reverse) during landing or taxi
- upon selecting HP bleed valve off with PL in GND IDLE
After Flight
When leaving the aircraft unattended, the LP is to ensure the security of the aircraft and that all doors are closed.
The LP is responsible for:
- Checking weather/NOTAMs.
- Performing the Transit Checklist (when the flight deck is to be left unattended).
- Ordering fuel (if required).
The RP is responsible for:
- The Post Flight Inspection.
- Assisting with baggage/freight. At ports where loaders are employed it is still the crews' responsibility to supervise the correct opening and closing of the aircraft doors and the placement of baggage/freight and to secure if necessary.
- Obtaining updated briefing material.
Note
An SPFIB Update only provides changes that have occurred since the original briefing was first obtained and does not replace it.
- The completion of the Trim Sheet for the next sector.
- Collecting and distributing inter-port mail.
Single Engine Turnaround
1 - Park Brake
2 - CL (Both)
3 - Transponder
4 - LEFT Bleed Valve
5 - DC AMP / VOLT Selector
6 - LEFT Gen
7 - Bus Tie
8 - LEFT CL
9 - LEFT Auto Ignition
10 - Seat Belt Sign
11 - RIGHT PL
12 - X-Valve
13 - RIGHT HP Valve
- Do not use when OAT < 20°
- Max ITT 800°
- Ensure NG 77%
Note
- Before FO leaves, flight times and fuel must be calculated on EFB
- Reset totaliser
- FO must not leave FD until Left Engine NG < 20%
1 - ECS
2 - BATT / EXT PWR
3 - LIGHTS
4 - PARK BRAKE / HYD PANEL
5 - FDR
6 - CB's
7 - OXY
8 - CABIN PRESS
9 - PL / CL
10 - CABIN SECURE
Note
- Run engine start checklist and start scan as normal. Reset fuel only when FO has accounted for SET fuel.
- ENSURE YOU SELECT LEFT START ONLY